Categories
Database Link LDAP Oracle

How to create an Oracle Database Link using LDAP authentication

Oracle Database Link

While it is not possible to create a database link using LDAP credentials, it is possible to lookup the TNS details through LDAP, which will allow you to create a database link using the TNS entry. Firstly, we need to successfully connect locally to the database using our known LDAP credentials e.g. below:

Database Service: TEST_DB_SERVICE
Database User: DBUSER
Database Password: SECRETPASSWORD
Directory Servers: (OID.GLB.IN.SAMPLEDOMAIN.COM.AU::3131)
Default Admin Context: “dc=in,dc=SampleDomain,dc=com,dc=au”
Directory Server Type: OID

To do this we need to configure our computer.

1. Configure the Oracle Client files in the $ORACLE_HOME/network/admin directory.

ldap.ora: (create new file)
DIRECTORY_SERVERS = (OID.GLB.IN.SAMPLEDOMAIN.COM.AU::3131)
DEFAULT_ADMIN_CONTEXT = "dc=in,dc=SampleDomain,dc=com,dc=au"
DIRECTORY_SERVER_TYPE = OID

Note: the double-colon before the port number (“::3131”) is not a typographic error. It is required syntax for the Secure LDAP protocol.
sqlnet.ora: (put this line first in the file)
NAMES.DIRECTORY_PATH = (LDAP,TNSNAMES)

2. Check to see if you can log in using the supplied schema, password and connection.

Here’s an example of logging in as DBUSER with SQL*Plus and the provided password:
sqlplus DBUSER/SECRETPASSWORD@TEST_DB_SERVICE

3. If you can successfully connect then open up a command prompt window, and execute the command tnsping TEST_DB_SERVICE to determine the TNS entry that we require:

C:\work\source\svn\dmt>tnsping TEST_DB_SERVICE
TNS Ping Utility for 32-bit Windows: Version 11.2.0.2.0 - Production on 11-FEB-2
015 11:02:06

Copyright (c) 1997, 2010, Oracle. All rights reserved.
Used parameter files:
C:\oraclexe\app\oracle\product\11.2.0\server\network\admin\sqlnet.ora

Used LDAP adapter to resolve the alias
Attempting to contact (DESCRIPTION = (ADDRESS = (PROTOCOL = TCP)(HOST = ssdb0401
n01-oravip.in.sampledomain.com.au)(PORT = 1521))(ADDRESS = (PROTOCOL = TCP)(HOST = ss
db0401n02-oravip.in.sampledomain.com.au)(PORT = 1521))(LOAD_BALANCE = yes)(CONNECT_DA
TA = (SERVER = DEDICATED) (SERVICE_NAME = DF0014D_A_S_O_01.in.sampledomain.com.au)))
OK (90 msec)

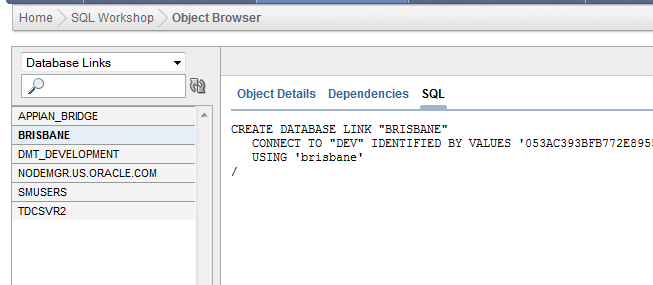
4. Now we got everything we need to create the database link:

CREATE DATABASE LINK "TEST_APP"
CONNECT TO "DBUSER" IDENTIFIED BY "SECRETPASSWORD"
USING '(DESCRIPTION = (ADDRESS = (PROTOCOL = TCP)(HOST = ssdb0401n01-oravip.in.sampledomain.com.au)(
PORT = 1521))(ADDRESS = (PROTOCOL = TCP)(HOST = ssdb0401n02-oravip.in.sampledomain.com.au)(PORT = 1521))(LOAD_BALANCE = yes)
(CONNECT_DATA = (SERVER = DEDICATED) (SERVICE_NAME = DF0014D_A_S_O_01.in.sampledomain.com.au)))'
/

Categories
4.1 ApEx Bug Oracle Pagination

Oracle Application Express 4.1 pagination number of rows resets to 15 bug

So you create what appears to be a simple classic SQL report region. It contains a lot of rows so you specify a pretty high number in the “Number of Rows” value under “Report Attributes” “Layout and Pagination”. In this example, I set it to 100.

Layot and Pagination Number of Rows

You run the report and all looks well… until you click “Next >” to get the next page!

ApEx report first page

All of a sudden, the number of rows dwindles back down to 15 and it stays that way! Imagine trawling through thousands of rows 15 at a time. How annoying!

Oracle ApEx report next page

Luckily for us, the patch fix is simple. All you have to do is:

1. Create a Hidden Item for the page where your report is.
2. Under source -> Source Used, set the Source Used to “Always, replacing any existing value in session state.
3. Under Source -> Source Type, leave the value set to “Static Assignment (value equals source attribute).
4. Under Source -> Source value or expression, set the number you would like for the number of rows. In this instance, I set it to 100.

New hidden page item source

5. Apply changes then go to your report’s Report Attributes – Layout and Pagination. Under Number of Rows (item), enter you hidden item name.

Oracle ApEx report attributes' Layout and Pagination Number of Rows (Item) value
Oracle ApEx report attributes’ Layout and Pagination Number of Rows (Item) value

6. Apply changes, and the problem should be fixed

Categories
ApEx Oracle

LOV query is invalid in Oracle ApEx 4.1 when using subquery

So you create a List of Values in Oracle Application Express 4.1 using a simple in-line query similar to the one below:


SELECT d, r FROM
(
SELECT 1 d, 1 r
from dual
UNION ALL
select 2 d, 2 r
from dual
UNION ALL
select 3 d, 3 r
from dual
)

You get the following error:

1 error has occurred
LOV query is invalid, a display and a return value are needed, the column names need to be different. If your query contains an in-line query, the first FROM clause in the SQL statement must not belong to the in-line query.

LOV query invalid
LOV query invalid

You copy the query, paste it in SQL Commands in SQL Workshop, and it ran successfully. You try to create the LOV one more time, but you get the same error again. By this time your brain is working overtime thinking of a thousand different workarounds. There are a hundred strands of hair on your desk resulting from your frustration.

Lucky for you, you stumbled upon this site because the solution is simple.

Put a space after the first “FROM” keyword in your query.

LOV query invalid workaround
Categories
ApEx Error Handling Function Oracle Team Development

Oracle Application Express Error Handling Function

Want to record errors thrown within your Oracle ApEx 4 (and above) application without writing a lot of complicated code? It’s really very easy if you utilize Oracle ApEx’s built in functionalities, which in this situation are Error Handling Function and Team Development. With a small piece of code, we can easily record exceptions thrown in your application and capture all relevant debugging information so we can action on them.

First, we’ll need to write an error handling function. Compile the following code in your database:


create or replace function errorHandling(
p_error in apex_error.t_error )
return apex_error.t_error_result
is
l_result apex_error.t_error_result;
l_reference_id number;
l_constraint_name varchar2(255);
begin
l_result := apex_error.init_error_result (
p_error => p_error );

— Log ORA errors only
if l_result.additional_info like ‘ORA-%’ then
apex_util.submit_feedback (
p_comment => ‘[message]= ‘ || p_error.message || chr(10) ||
‘[additional_info]=’ || p_error.additional_info || chr(10) ||
‘[display_location]=’ || p_error.display_location || chr(10) ||
‘[association_type]=’ || p_error.association_type || chr(10) ||
‘[page_item_name]=’ || p_error.page_item_name || chr(10) ||
‘[region_id]=’ || p_error.region_id || chr(10) ||
‘[column_alias]=’ || p_error.column_alias || chr(10) ||
‘[row_num]=’ || p_error.row_num || chr(10) ||
‘[error_backtrace]=’ || p_error.error_backtrace || chr(10) ||
‘[component_type]=’ || p_error.component.type || chr(10) ||
‘[component_id]=’ || p_error.component.id || chr(10) ||
‘[component_name]=’ || p_error.component.name,
p_type => 3,
p_application_id => v(‘APP_ID’),
p_page_id => v(‘APP_PAGE_ID’),
p_email => null);
commit;
end if;

return l_result;
end errorHandling;
/

The code simply grabs all useful information about the error and posts it as a feedback which we can view through the Team Development section of Application Express.

Next, we need to define the error handling function in the application definition:

  • Login to Application Express
  • Click on “Application Builder”
  • Click on the application
  • Login to Application Express
  • Click on “Edit Application Properties”
  • Scroll down to “Error Handling” and add “errorHandling” (without the double quotes) into the field “Error Handling Function”.
  • Click on the “Apply Changes” button
Error Handling Function

That’s it! Now we just sit back and watch the bugs trickle down in Team Development.

To view the bugs in Team Development:

  • Login to Application Express
  • Click on “Team Development”
  • Click on “Feedback”
  • Under “Top Applications”, click on the number on the right hand side (represents total feedbacks/bugs received)
  • You’ll see the list of the bugs, click on “Edit” on one of them to see the bug details.
  • You’ll see the error details at the top, and the session values at the time the error was raised down the bottom.
Error Details
Error Details from Feedback in Team Development
Session Values
Session Values from Feedback in Team Development
Categories
ApEx Oracle

How to Create Page Zero in Oracle Application Express 4.1

Page zero is a useful page in Oracle ApEx that gets executed for every page request in your application. It can be utilized if theres a certain component or function (eg. computation, validation, region, etc.) in your application that is common to all your pages.

To create page 0, do the following:

  • Login to Application Express
Login to Oracle Application Express
  • Click on “Application Builder”
  • Click on the application you want to modify
  • Click the “Create Page >” button
Create Page
Create Page
  • Select “Page Zero” as the page type
Create Page Zero
Create Page Zero
  • Click Finish
Categories
ApEx Bug Oracle

Oracle ApEx 4.1 Incorrect Sort Order Image for Classic Reports

We recently upgraded our Oracle ApEx installation to 4.1. No major issues but a significant annoyance is that when you click on a sortable column on a classic report, the sort image (up and down arrow/pointers) are reversed. It appears that the problem is currently not patched by Oracle, but fortunately, there’s a workaround which works quite nicely and I’ve provided step by step instructions here with screen shots.

There are three main steps to apply the workaround. First step is to add a JavaScript to your page template.

Step 1. Add JavaScript

  • Login to Application Express
Login to Oracle Application Express
  • Click on “Application Builder”
  • Click on the application you want to modify
  • Click on “Shared Components”
  • Under “User Interface”, click on “Templates”
  • In the list of templates, scroll down to “Page” and edit the default template (indicated by a tick)
Edit Default Page Theme
  • Paste the following javascript in the Header definition just before the closing head tag (</head>):

<script type="text/javascript">
<!--
function correctStdReportSortImage(pThis){
var $img = pThis instanceof jQuery ? pThis : $(pThis);

//Only run the code if the image actually exists.
//Since this code will be listening to the entire document’s refresh events it could get other events (such as IR)
if ($img.length > 0) {
//If the href has ‘desc’ in it then make sure the image is ascending as the presence of “desc” means column is sorted asc
$img.attr(‘src’, $img.parent().children(‘a’).attr(‘href’).indexOf(‘desc’) > 0 ? $img.attr(‘src’).replace(‘down’, ‘up’) : $img.attr(‘src’).replace(‘up’, ‘down’));
}
}//correctStdReportSortImage
//–>
</script>

Paste Code in Header
  • Apply changes then click on “Application Builder”

Step 2. Add First Dynamic Action on Page 0

  • Click on the application you want to modify
  • Click on page 0 to edit it. If you haven’t created page zero, you need to create one. Instructions on how to create page 0 can be viewed here.
Click Page 0
Click on Page 0
  • Under “Dynamic Actions” click on the icon to add a new action
Add New Dynamic Action
  • Click on “Advanced”
Click On Advanced
Click On Advanced
  • Type in a name (anything will do, for this example I typed in “Page Sort Image Fix Page Load”) then click on the “Next >” button
Type in Dynamic Action Name
  • Under “Event” select “Page Load”, leave condition as is then click on the “Next >” button
Select Page Load Event
  • Under “Action” select “Execute JavaScript Code” then paste the following JavaScript into “Code”:

$(this.affectedElements).each(function(){
correctStdReportSortImage(this);
});

Select Execute JS Code
  • Click Next
  • Under “Selection Type” select “jQuery Selector” then paste the following text under “jQuery Selector”:

.rpt-sort img

jQuery Selector
jQuery Selector
  • Click on the “Create” button

Step 3. Add Second Dynamic Action on Page 0

  • Under “Dynamic Actions” click on the icon to add a new action
  • Click on “Advanced”
  • Type in a name (anything will do, for this example I typed in “Page Sort Image Fix After Refresh”) then click on the “Next >” button
Type in 2nd Dynamic Action Name
  • Under “Event” select “After Refresh”
  • Under “Selection Type” select “DOM Object”
  • Under “DOM Object” enter the following text:

document

After Refresh Action Parameters
  • Leave condition as is then click on the “Next >” button
  • Under “Action” select “Execute JavaScript Code” then paste the following JavaScript into “Code”:

correctStdReportSortImage($(this.browserEvent.target).find('.rpt-sort img'));

2nd Dynamic Action JS
  • Click Next
  • Leave “Selection Type” as is then click on the “Create” button

That’s it. Good luck.